Showing posts with label Nail Art. Show all posts

Sunday, March 20, 2011

Nautical

Using my nails from the previous post, I decided to do a nautical theme mani. but this is my first time doing it and I haven't practiced really so don't hate on my nails! ^______^;


So all I did was add stripes to my nails & added an anchor on my middle finger (which looks crappy) with Kiss Nail Art Paint in White


Hope you enjoyed & don't forget to enter in my 300 follower giveaway!
happy polishing, <3katherine

Tuesday, March 8, 2011

My Space Nails

I've been meaning to do these nails for a while. SPACE NAILS and credits go to Asami's Space Nail tutorial. I hope you enjoy, they don't look much like space to me (compared to Asami's) but it reminds me more of a nebulous cloud in space, maybe because I sponged too much =P


Materials I used:
OPI Suzi Skis in the Pyrenees Suede (since I didn't have ManGlaze Matte is Murder or Zoya Dovima)
OPI DS Original (for the holo part)
Misa No Shrinking Violetta (for the sheer duochrome part)
Pa Nail Color A125 (for the stars)

I got a compliment today when I wore them out for the first day. :)
Hope you like them as much as I do!~
happy polishing
and don't forget to enter into my CSN giveaway (ends March 12) and my 300 follower giveaway (March 26)! Just to clarify, the picture is from google and it is not the actual polishes that I will be giving away :P
<3katherine

Sunday, February 6, 2011

GLEE!

Manhattan 610K entries are now in and I will input everything and get a winner soon. :) On other GOOD news today, other than the SUPERBOWL, GLEE is finally coming back! It's one of my favorite shows and to celebrate its comeback, here's a mani. that I did especially since I was able to pick up a bottle from Sephora - one from the Glee collection by Sephora by OPI Glee.

Sephora by OPI Gleek Out
3 coats because it was a bit on the sheer side and just to be safe from vnl. I free handed the letters with a nail art brush. It's a lime green but probably darker than OPI Simply Smashing from Serena Williams. 

hope you enjoyed & happy polishing!
<3katherine


Sunday, January 30, 2011

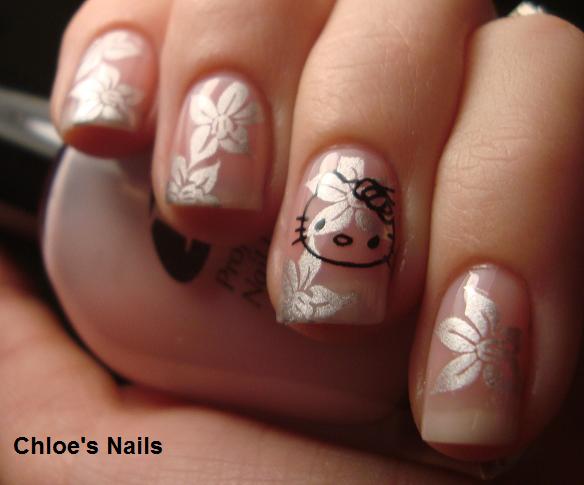
Hello Kitty Funky French Nail Art thanks to Born Pretty

Here is another item that was sent to me for review from Born Pretty. It's their nail stamping image plate, M71, stamper & scraper.
Here is the mani I did.....How freaking cute is this!?!?1 You know what....I might actually leave this on all day! Yep, that's a record for me, lol.

Here is what I received. The stamper, scraper and the image plate


Most image plates have a very thin film that you might not even see. Just make sure to remove it.


and here is my nail stamping set-up, lol. I've taken control of one of our TV trays, can you tell. It works perfect though for stamping. Then I always make sure to have 100% acetone, my green coaster, for the cotton ball/pad soaked in acetone, image plate, stamper, scraper, and polishes I plan on using. Oh and after I took this pic, I decided to not use the Konad polish in white, but instead used black.


Grandpa, the pup, well 16 years young, we adopted a few months ago, just had to watch, lol.

Before I started stamping, I applied 2 coats my base coat of Brand 10, color #415, Pinky Promise


Now on to stamping. I used the flower image on the plate first, and used China Glaze Millenium for them. Then I used the cute Hello Kitty image, and Konad polish in black for that :)


Finally I did my black tips with Sinful's Black on Black and added a tiny rhinestone to her bow :)


I LOVE this!! What do you guys think???

Also don't forget, if you plan on ordering from Born Pretty, don't forget to use my code: CHLOEK31 to receive 10% off.

Thursday, January 27, 2011

Kelier Black Crack Polish from Born Pretty

So Jessica from http://bornprettystore.com/, which btw, has some other amazing nail art items, sent me the Kelier Black Crackle Polish for me to review.
I will say that I had to play with it for a few minutes, to discover the best way to use this Crack polish, and here is what I learned. In order to get the effect I preferred, I needed my base coat to dry 100%. When it was, I applied a pretty thick coat of the Black Crack polish, and waited. Now unlike others I've tried, this one did take a smidge longer for the cracks to appear, but once they did, i loved it! Then I also learned that if you plan on using a top coat, WAIT. The Crack polish needs to be 100% dried. If it is not, when you apply it, it sort of fills in the cracks, and just looks like a plain old black polish.

Here was my final mani....Now I know this look isn't for everyone, but I'm a fan :P


The pic below is where I was playing in the beginning. My ring finger, 3rd finger, was the one that I let my base dry completely, and applied a thick coat of Crack polish over top, and also waited for the Crack Polish to dry 100%.

My pointer, middle & pinky, I also applied dry, but applied a VERY thin coat of Crack polish. This caused TONS of itty bitty cracks, which did look cool, but I preferred the fewer tad bigger cracks. Then you can kind of see how when I applied my top coat while the Crack polish was still semi wet, that some of the cracks vanished, and filled in. It was weird.


If you are interested in ordering from Born Pretty, use my code, CHLOEK31, and get 10% off from now till March 31st, 2011,

Monday, January 24, 2011

Sisterhood of the Nail Polish Lovers

I deleted the previous post because I forgot to say that in order to be able to enter in to try and get Manhattan 610K, you must be a GFC follower with a blog. You must comment with your GFC follower name, blog url, email and where you're located. THANKS! 
So if you already entered, I'll notify you via email to enter again, my apologies!! 
Please note that you aren't actually keeping the nail polish forever, but passing it along to another person :P

Today I'm sharing a great experience from the nail polish blogging world. You've probably heard about it before from other blogs, such as Kesha's Nail Polish Obsession, Sammy's The Nailasaurus, Jenny's Polishology and Jessika's Polish Insomniac. No, it's not the sisterhood of the traveling pants! :P Yeah, that's right, it's MANHATTAN 610K; the traveling nail polish! :) It first started with Kesha in Germany which later traveled to Sammy in the UK then it made its way to the US with Jenny and Jessika. It's luckily in my hands now and here's my take on Manhattan 610K. Kesha keeps an update on Manhattan 610K's location so you'll see from both of us, to see where it goes next! :)

Manhattan 610K is a medium deep purple creme. I love the color and I wish it was mine forever! But it will make its way to another nail polish lover's hands :) I used 2 coats of Manhattan 610K in the first few swatch pictures and then I used it as the base of my nail art mani. Cupcake design! Yes you've probably seen it before but here's my cupcake designs. Trust me, this is my first time doing it so it took me a while to get the hang of it. :P But don't worry, I practiced with a different base beforehand (still takes getting used to a new design)! Anyways, I used China Glaze For Audrey, Lemon Fizz and Something Sweet as well as OPI Rumple's Wiggin' for the cupcake toppings. :P I also made sprinkles out of those colors and Manhattan 610K, alternating a color out depending on its cupcake topping color.


If you're interested in receiving Manhattan 610K next, 
Please comment with your GFC follower name, blog url, email & where you are located.
Anyone with that's a follower with a GFC name & blog can enter no matter where you are located!
I'll be taking entries until February 5th, 2011.


Stay tuned and find out who will get Manhattan 610K next. :)

Hope you enjoyed & happy polishing! :)
<3katherine

Friday, January 7, 2011

Impractical Shmactical, I LOVE it!

Now I do realize that this mani is beyond impractical, and I'm 100% okay with that. This wouldn't be an everyday mani, but a night out. I mean, none of my manis stay on for more than a few hours anyways, lol. I have done this same look with a blue butterfly, and if you would like to see, click here. I just love the black tips, with a big 3D, colorful accent on 1 finger. What do you guys think, too much? Do you like 3d nail art stuff?


Thursday, January 6, 2011

Mermaid Attempt

Hey everyone! :) I hope you all are doing well~ Today I'm going to show you a swatch, that you've probably seen before but it's new to my collection, so I hope you enjoy. I also attempted to do a nail art, which is part of my resolution, to be more creative and experimental with nail art, so I hope you'll like it. The nail art wasn't anything planned, it just came to me as I did the swatch. I actually like it although it doesn't exactly reach what I was thinking of.

Today's SOTD is OPI Here Today... Aragon Tomorrow Suede. It's a beautiful medium forest green shimmer. It's beautiful and opaque in 2 coats. The swatch shows both without and with top coat. I think it's absolutely beautiful and I don't know why I haven't gotten HTATS sooner :P! Formula and application was smooth and easy as well.


The NAOTD is Mermaid Scales :P I used 2 coats of OPI Here Today... Aragon Tomorrow Suede, drew scales with KISS Nail Art in Pearl Black then filled in the spaces with China Glaze Fairy Dust to add a more 'mystical' look to the scales :P In my opinion, I think I did a pretty good job. Hope you think so too!


Anyways, hope you enjoyed & happy polishing!
<3katherine

Tuesday, January 4, 2011

The New, Bad, Beautiful and Good

Hi all~ :) I hope everyone had a great New Years! Mine was alright, and I'm trying to work a bit more even with the lack of hours they gave me. This is my first post for the New Year! :) Anyways, onto nails~ today I'm posting the new, the bad, beautiful and good. The new? meaning new brand or something I haven't tried yet. The bad? Something that didn't come out exactly the way I wanted to, but it isn't that bad. The beautiful? The shades I picked out for today. The good? A pretty good nail art, since I haven't been doing that much lately.

First, here is the new and beautiful. Rimmel 60 Seconds in Night Before (#615). It's a dark purple shimmer with orange and pink iridiscent. The swatch is 2 coats and 1 coat of top coat. The pictures don't show the iridiscents well but you can kind of see it in the bottle. I've never seen these bottles until I went to Kmart, which I don't go to very often.


The pretty bad is the nail art I tried. I tried to make a flower but first the center white came out too much and I think I could've done better. But hey, I tried! And I'll probably practice some more. :P

Another beautiful and new is Wet N Wild Blackmail (#218). This is 3 coats; just to be safe for the color and missing spots and 1 coat of top coat. It's a black base jelly-creme-ish but more creme. It contains orange/copper glitter inside as well. Totally awesome and it was my first time seeing this one! So lucky I found it at Kmart :)


The (pretty) good? Penguin nail art! I've seen a lot of this recently, especially by Pan and I've been meaning to try it out. So I tried to make a bow tie and failed so I covered it up and not well enough and it swirled a bit with the pearl black nail art I used. But pretty good in my opinion! I gave him a sparkly nose, kind of like Rudolph :P


I picked up an extra bottle of Wet N Wild Blackmail for my giveaway that I will start when I reach 300 followers. I don't have the prize all picked out yet, but I will try to get some here and there :)

Anyways, I hope you all enjoyed & happy polishing!
<3katherine
Friday, December 24, 2010

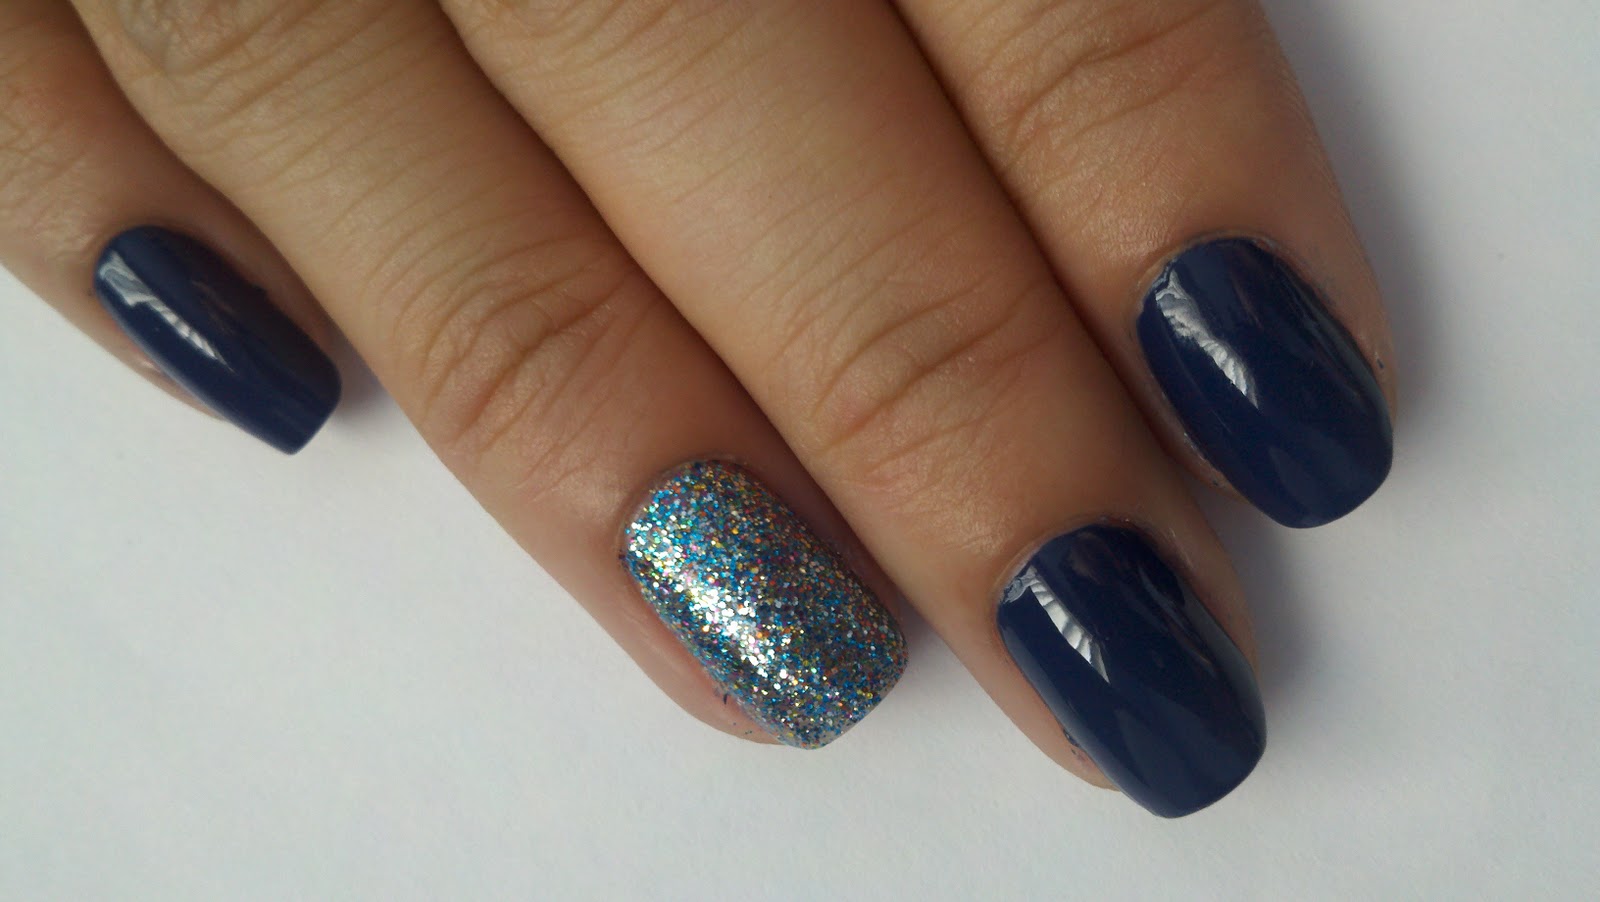
Christmas Mani

Hey everyone! I hope everyone is doing well :) Tomorrow's Christmas day, so here's my better-late-than-never mani. for Christmas! I wish everyone a Merry Christmas, Happy New Year and happy holidays for those who celebrate something different :)♥

On my left hand is 2 coats of China Glaze Mistletoe Kisses and on my ring finger is 2 coats of Sinful Colors Show Me White topped with OPI Jade is the new Black, the yellow is China Glaze Lemon Fizz, the red is Kiss Nail Art in Red and the brown is OPI Black Cherry Chutney.


On my right hand is 2 coats of China Glaze Phat Santa and 1 coat of China Glaze Mrs. Claus on top. On my ring finger is 2 coats of Sinful Colors Show Me White and the red is Kiss Nail Art in Red.


I hope you enjoyed, happy polishing & most of all, happy holidays!♥(:
<3katherine

Tuesday, December 14, 2010

The Start of Something Fantastic!

I want to transform my nail blog into a blog, that not only includes nail polish and nail art, but I'd like to incorporate more beauty and fashion things that I like also. I hope this doesn't bore anyone.

But like Forever21, who has something called "Fabulous Finds," I decided to create somthing similar to that but I call it "Fantastic Finds," where I will post about things I find that are at a great price or something fantastic that I'd like to share with everyone.

nail polish picture credit to: http://www.duggal.com/connect/fashion/fashion-fact-17
which I found via Google 
My first fantastic find includes 3 things. The first is a bottle of hot pink nail art. They mostly sell for $1.50 or more but I was able to find this Mattese Elite for $1! They sell these at Ricky's and their regular price for both nail art and nail polish is $5.99! That's outrageous for nail art to be $5.99!! Sadly, it was the only color available on sale.
My second and third fantastic find is 2 loose eyeshadows from Forever21 which I got for $0.99 each!! They retail $2.80 normally but I dug and found the white one. The one on the left is called Emerald City and the one on the right is called White Sparkle. I think I might use it sometimes to franken too :)


Hope you enjoyed my first post of Fantastic Finds and please let me know your opinion on this topic. :)
& of course, happy polishing!
<3katherine

Monday, November 15, 2010

Just not feeling this mani....Oh well, Can't love them all.

I'm not sure why I don't like it, I kind of feel like it makes my nails look nubby. I used Wet n Wild's Nocturnal, OPI Catch Me In Your Net and 10's  #415, the pink base.
I started with the 415, than taped off my nail doing one side of the tip. After that dried, I did the other.


When it came time to do the OPI on my tips, I got kind of lazy and just cut the zig zag end of the tape off, and turned it, so the sides lined up with the Nocturnal tips.